Technical Challenges of Sunset Photography
Is Sunset Photography Easy?
At first glance sunset photography seems easy. Just point the camera in the direction of the beautiful sunset and there you have it. And sometimes that works - you are in the right place at the right time and don't have a fancy camera and you can still get a stunning sunset image using your smartphone or compact camera. However if you want to purposefully and consistently create a collection of professional sunset images that display a specific style or photographic vision you must work with the following challenges: 1) the ability to predict weather conditions that create dramatic sunsets, 2) decide what equipment and camera settings to use and have the flexibility to adjust as conditions change, 3) understand quickly changing light conditions and 3) be able to create interesting compositions.
Predicting Weather Conditions
Some people call meteorologists "weather guessers" and sometimes predicting weather can involve a bit of guessing based on experience. Even though there is science involved in predicting what conditions create a dramatic sunset, conditions can change rapidly and are unpredictable so some guess work is inevitable.
Predicting Drama
At the time of sunset, the sun is at a low angle in the sky which allows the longer wave lengths of yellow and red to be more pronounced. In order to anticipate the degree of red and yellow that will be reflected in the sky you can use some general guidelines. 1) A sunset is usually more dramatic after a storm or raining day. 2) Thin high and mid-level clouds reflect color, while low thick clouds obscure the sun. A 30 - 60% cloud cover of broken clouds is ideal. 3) Vivid colors can travel longer distances through the lower atmosphere when the air is very clean, such as after a rain storm or in a tropical area, so clean air makes for more vivid sunsets. (Note: that a hazy or smokey sky can also create interesting effects.) 4) Wind is a factor to take into consideration. Wind can create interesting cloud patterns or blow in unwanted thick clouds. 5) Weather apps and sunset predictor apps can help predict weather conditions or sunset quality but are not always as accurate. Watching the sky in the late afternoon and noting the conditions mentioned in guidelines 1-4 may yield better results.
 Fire in the Sky in Mexico
The above image from Cobo, Mexico is an example of vivid colors traveling through the lower atmosphere in a tropical region with clear air. Although there are low thick clouds on the horizon, the red light is still very visible because the air is so clean.
Time of Year
Spring and summer are always fun times to photograph sunsets because the days are warm and the clouds are not obscuring the sun. However even if the sun is not visible as much in the autumn and winter months there are often more dramatic sunsets this time of year because of the low angle of the sun on the horizon and the lower humidity which scatters color.
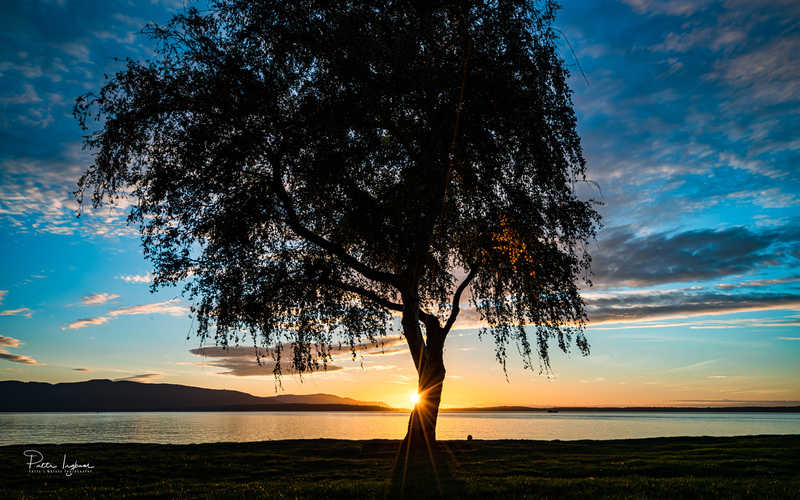 Sunstar Over Bellingham Bay
This image was taken on an autumn evening when the cloud cover was ideal. The cloud cover was about 30% with broken clouds high above the horizon. Since the angle of the sun was lower to the horizon in the autumn months, the color from the golden rays of the sun were more intense and also accentuated by the contrast of the silhouette of the tree.
Equipment and Camera Settings
As with any form of photography practice and patience is required to find the right mix of equipment and camera settings that accentuate your style or vision. During a sunset photo shoot the conditions change quickly and it is often necessary to change out equipment and quickly change camera settings.
Tripod
An important piece of equipment for sunset photography is a tripod. A tripod is used for long exposures in the low light that disappears quickly as the sun sets below the horizon. It is also easier to review images and settings if the camera is mounted on a tripod while the light constantly changes. Because you will also want to carry the tripod from place to place to change your viewpoint, it is important to have a light, easy to carry tripod that is stable and easy to adjust. If you take many of your sunset photos from a beach you will want to use a tripod that is resistant to water and sand damage. To help maintain image sharpness you will also want to use a remote shutter release with your camera.

This image was taken at Fisherman Bay on Lopez Island in Washington State. In the shadows in the foreground you can see my camera securely mounted on my tripod waiting for a long exposure shot.
Lens and Filters
A wide-angle zoom lens with focal lengths shorter than 24mm or 28mm is ideal for capturing sunsets because it can encompass a vast landscape or seascape scene. A wide-angle lens can also create a superior starburst effect. You can experiment with which focal length is best by zooming in and out of the scene, then review the composition and choose the one you like best.
As with many photographic techniques the use of lens filters for sunset photography is debated. Some say that using a filter adds additional "glass" in front of the lens leading to more lens flare or that using filters on your lens will add vignetting around the edges of an image at the widest zoom of a wide-angle zoom lens.
I have experienced both of these phenomenon at times and removed my filters. However at other times using a Neutral Density (ND) filter or Circular Polarizer (CPL) filter has helped me achieve the results I desire. Neutral Density filters are useful to use before the sunset to hold back some of the light and allow for long exposures that will create motion in the clouds or smooth out water. Circular Polarizer filters are helpful to reduce glare from reflective surfaces in bright light. A 3-stop Neutral Density filter is effective for reducing light. I have also experimented with a 10-stop ND filter which reduces the light by 1000 times, however this tends to be overkill.
 Bright Smokey Sunset
I used a wide-angle lens to create this sunset image because it emcompassed the foreground, water, islands, horizon and sky all in one scene.
Camera Settings
A few easy guidelines for camera settings for good sunset photos include: 1) Shoot in aperture mode with aperture f/11 or f/16. Note that setting your f-stop to a number larger than f/16 can reduce the sharpness of your image. 2) Set your focus point for about one third into the scene. 3) Generally an ISO of 100 to 200 will reduce the amount of noise in the image, however if you want to blur waves in the foreground you can increase the ISO to reduce the shutter speed in order to "soften" the motion of the waves (or as mentioned above, use a neutral density filter).
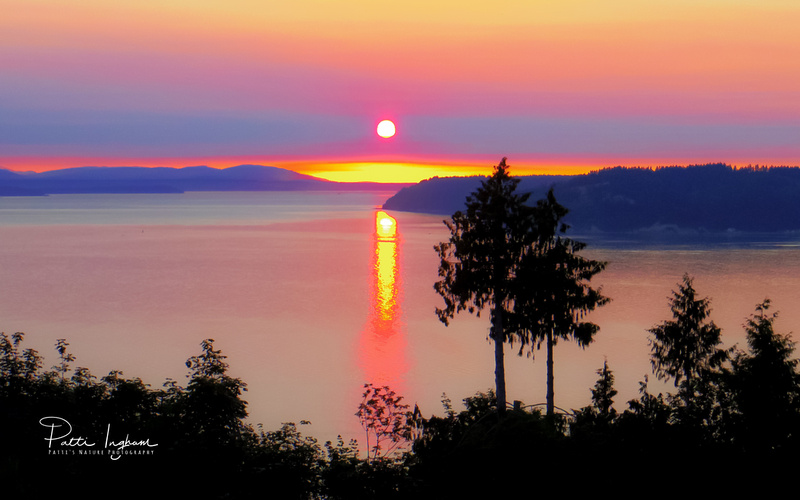
 Pink Reflection
The camera settings for the above image were aperture f/16 with a shutter speed of 2 seconds (a long exposure) in order to blur the motion of the waves in the foreground and create a silky effect.
Lighting and High Dynamic Range
During a sunset the sun provides the light but what's important is how the light illuminates the scene.
High Dynamic Range photography involves bracketing the same shot at different exposures to capture the lowest light values and highest light values then combines the images using "blending software" to produce one image that has a wider range of shadows and highlights. Exposure variations can be set using a camera's automatic bracketing feature or in some cases some smartphones (or cameras) have HDR modes or apps for creating an HDR image "in camera".
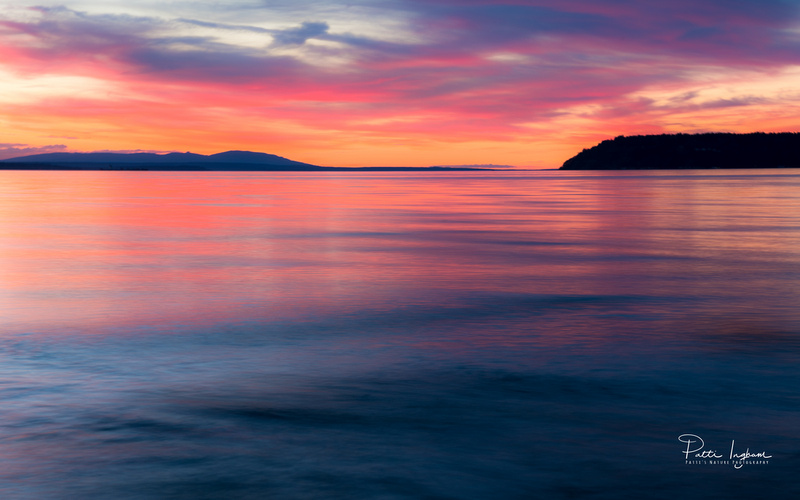
 Mirror Mirror on the Water
This photo was created by blending two images taken at different exposure values in order to capture a greater dynamic range of lighting that can better represent what was seen by the human eye at the time.
Interesting Compositions
When composing sunset photographs one thing is almost always certain - there will be a horizon where the earth meets the sky. Another thing that is quite certain is that placement of the horizon in the composition is a personal preference. Some like to use the "rule of thirds" and place the horizon on the bottom third of the image and some prefer the horizon in the middle of the composition. Personally I like to change up where I place the horizon based on what elements of the scene I want to emphasize.
Finding an interesting foreground or items that can be silhouetted can also make a sunset composition interesting. Changing your orientation to the direction of the light can make for a unique composition. It is always good to "look behind you" (or to the side) for a fresh perspective.
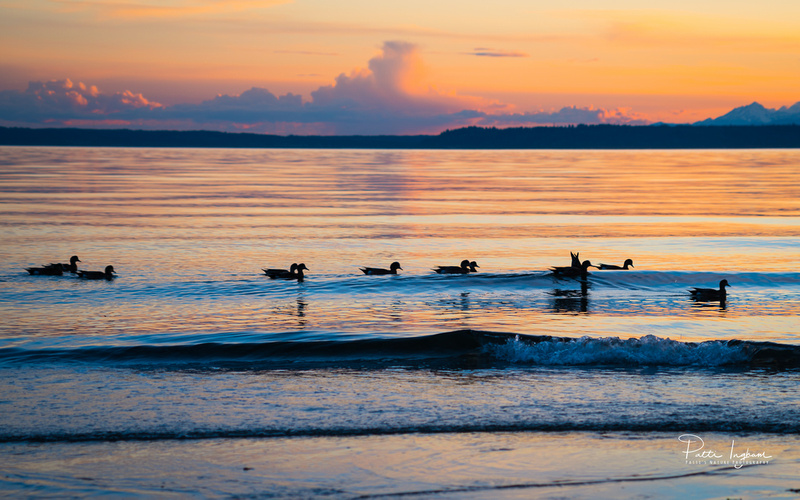 Getting Your Ducks in a Row
This sunset composition is unique because rather than placing the horizon on the lower third of the image, it is placed in the upper third of the image. This draws your eyes to the horizontal lines of the water in the foreground. The birds traveling through the water in a horizontal line also add interest and the beautiful colors of sunset reflected in the cloud formations in the sky are still a strong part of the composition.
Conclusion
Sunset photography is enjoyable and you can make it as technical as you want by experimenting with all of the guidelines offered in this blog post or you can make it as simple as you want by simply pressing the shutter button on your camera or smartphone to see what you get. Like Forest Gump said, "Mama always said life was like a box of chocolates. You never know what you're gonna get."
Patti Ingham, © Patti's Nature Photography